Labels in the kitchen—how old is this mustard anyway?


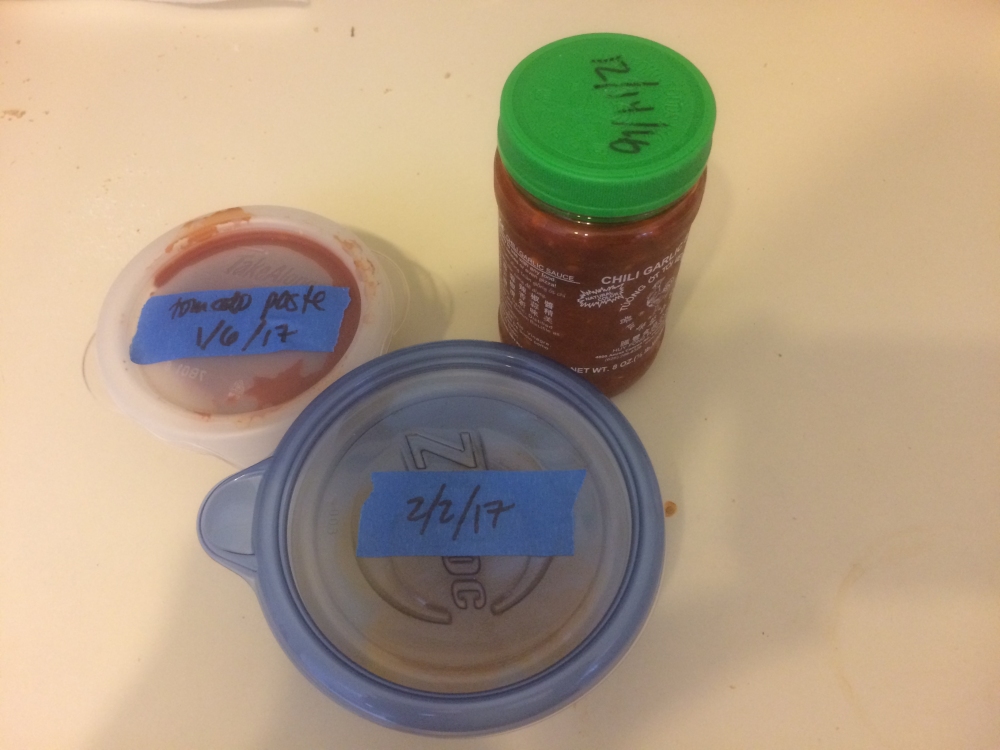
For my first try at a household hint (hello, Heloise!), I’m going to discuss labeling food with the date it was opened. There are two categories of foods that particularly benefit from labeling—leftovers and condiments.

Leftovers are the most obvious candidates for a date-label. You don’t want them to sit around so long that they become unsafe. But how long has that leftover casserole actually been in there?
When I put a plastic container of leftover soup in the fridge, I can’t imagine forgetting that I made soup on Monday. But perhaps Tuesday I go out for dinner, and maybe Wednesday I don’t remember the soup till I’ve already started something else, and Thursday I don’t even think about it. On Friday I pull it out and cudgel my brain. Was it Monday or Tuesday that I made soup? I wasn’t here Tuesday—wait, was it over the weekend? No, surely not. It couldn’t have been last week—or could it?
The situation is even worse in the freezer. I’ve pulled things out only to realize they’d been in there two years (and I know this only because they were labeled.) Not only does it help to put a date on leftovers before freezing them, it also helps to write down what they are. After a few months, vegetarian soup and chicken cacciatore start to look a lot alike. Even pizza sauce and strawberry puree have a vague similarity when frozen.
Condiments usually have a long life compared to leftovers, but in a way, that’s part of the problem. Condiments that don’t get much use—say, plum sauce–can sit in the fridge for quite a long time without getting used up. After a while, it’s hard to remember if that plum sauce has been there for six months, or eighteen. Or thirty-two. Even if it hasn’t gone bad, it isn’t going to be good.
An example: Many years ago, when visiting my parents, we needed dijon mustard for some recipe.
“Oh, I don’t think that mustard can still be good,” my mother said. “It’s been there for ages.”
“It looks okay.”
“Really, I think it’s been years.”
But it was mustard, after all, and it didn’t smell bad. So we used it (and nothing bad happened.) But since my mother had insisted it was old, we bought a new jar of dijon to replace it. We brought it home, opened it, and compared the jars.
It was shocking! The new dijon was brighter in color, with a sharper, more dijon-y smell and taste. The old jar was clearly long past its prime.
In focusing on leftovers and condiments, I don’t mean to suggest that dates can’t be helpful on other food products. When I was single, I didn’t eat much peanut butter, and the longer I’d had the jar, the less I liked the peanut butter and the less I ate of it. Then some reason would come up to buy a new jar, and I’d suddenly discover that peanut butter was actually delicious! I had similar problems with corn meal (a fresh bag made really good corn muffins) and olive oil.
So if you find yourself pulling containers out of the fridge and wondering just how long that lasagna has been in there, and whether the cooked rice is from Monday’s stir-fry or the chicken and dumplings the week before, try labeling your food.
As far as how to label food, I like blue painter’s tape and Sharpie. It’s easy to spot, easy to write on, and comes off plastic containers with no trouble. It also works well on many other food containers, but sometimes it’s just as easy to use Sharpie directly on the label or jar top.
Till next post.

Homemade Vegetarian Marshmallows—a quest


Several years ago, my daughter became a vegetarian and discovered that marshmallows—so necessary for s’mores—are made with gelatin. Since gelatin comes from hides and bones, she needed an alternative.
At the time, I couldn’t find vegetarian marshmallows in the stores. (I think they are slightly easier to find now.) We had made marshmallows at home once or twice before, so I started looking for a vegetarian marshmallow recipe on-line.
The recipe that kept coming up basically substituted agar for the gelatin in a standard recipe, with few other changes. The person whose blog I got it from said it made great marshmallows—but after trying it twice (the first time I used flaky agar instead of powder), all I got was a nasty slimy goo.
I tried looking for other versions of the recipe, then for recipes using other thickeners. I found a recipe for marshmallows that used xanthan gum and egg whites, and lo!—it produced marshmallows!
homemade vegetarian marshmallows
 I was so thrilled that out of sheer gratitude, I immediately ordered the book that the recipe had come from: Demolition Desserts, by Elizabeth Falkner.
I made these again last week. Out of curiosity, I looked on-line for the website where I had discovered the recipe. I found a source of recipes using exotic thickeners from Agar to Xanthan gum, but it also listed that same unsuccessful agar recipe that I’d started with! And the source was a company that produced agar! Doesn’t anyone test these recipes? (If you have gotten the agar-only recipe to work, please tell me how you did it.)
So is it possible to make marshmallows using agar? Another source of a recipe using agar, Serious Eats, added a protein source, such as soy protein, and explained that the protein is needed to make it work. Gelatin is a source of protein, as well as a thickener, and egg whites provide protein in the recipe that worked for me. So maybe that is the answer and those other agar recipes were missing a key component.
Before deciding whether to list the recipe here, I checked into copyright law on recipes. Apparently lists of ingredients and basic instructions cannot be copyrighted (though it is only fair to list the source, if you know it.) Photos and elaborations on the instructions and comments about the recipe, however, are copyrighted. I also checked to see that this recipe is already available at various sites, though the quantities of water, corn syrup, etc. vary slightly.
So here is the version I use, with my own comments. If you want step-by-step photos, you’ll have to check other sites.
Ingredients
Cornstarch and powdered sugar for dusting
Oil
2 tsp xanthan gum
¼ cup water
Pinch cream of tartar
1 ¼ cups granulated sugar
¾ cup corn syrup
3 egg whites
½ tablespoon vanilla extract
Directions
  1. Prepare a 50:50 mix of cornstarch and powdered sugar for dusting the pan and the finished marshmallows. I suggest ¼ cup of each. (Some versions use plain cornstarch, but ick!)
  2. Oil and liberally dust a jelly-roll pan (for thinner marshmallows) or a smaller, deeper pan (I assume it works equally well to make thick marshmallows, though they may be more difficult to cut.) You may wish to line the pan with parchment first and oil and dust that instead.
  3. Mix xanthan gum with 1 tablespoon of the granulated sugar. Set aside. (You can get xanthan gum at supermarkets now—it is also used in gluten-free baking.)
  4. Set eggs out to reach room temperature. (I used pasteurized egg white product, which doesn’t whip quite as well but was adequate. You could also use powdered egg white, or real egg white. I’m not sure if there is a safety concern here or not, given that you are going to pour hot syrup into it later.)
  5. Start whipping the egg whites before the syrup boils. I recommend a stand mixer with a whisk attachment—marshmallow is thick stuff to whip. Whip the whites till they make soft peaks, about 2 minutes. (I’m not sure how soft, really—I may have stopped too soon.)
  6. Put water, cream of tartar, the rest of the granulated sugar, and the corn syrup into a pot. Leave room for it to foam up as it boils. Stir and heat to 248 degrees. (One recipe said not to stir it, but stirring worked fine for me.) You also will notice that the syrup goes from looking somewhat foamy to looking clear with bigger bubbles at around this point.
  7. With the mixer running on low speed, slowly and carefully pour sugar syrup onto egg whites. Avoid hitting the whisk—you don’t want hot syrup splashing around.
  8. Sprinkle on the xanthan gum-sugar mixture, and add vanilla extract or any other flavoring and coloring you want. Then turn up the speed to high and mix for 2-3 minutes till the marshmallow pulls away from the sides and clumps up in the whisk.
  9. Using an oiled spatula, scrape the marshmallow into the pan and try to spread it. Ha! Now give up trying to spread it, dust it with more powdered sugar/cornstarch, and pat it into shape with well-dusted hands. Dust it a bit more, cover it with plastic, and refrigerate for 4 hours.
  10. Then cut them with a powdered knife or pizza cutter or cookie cutter, dust the cut edges, and enjoy.
cutting board with knife and homemade vegetarian marshmallow squares
I store these in the fridge, but apparently the gelatin version can be stored at room temperature for a week. This makes me wonder if I actually need to refrigerate them. Recipes involving both egg white and lots of sugar, like royal icing, always leave me perplexed. At what point does the sugar make refrigeration unnecessary? So I’ll continue to play it safe and keep these in the fridge.
I’m not sure how these marshmallow do under fire (or on fire), but I can testify that they make perfectly good microwave s’mores.
Till next post.
Note: make sure your bowl, whisk, and the nearby areas of your mixer are free of any grease (butter, oil) from previous recipes, or the egg whites won’t whip.

On Failing a Caramel Taste-test


While at Trader Joe’s, I saw a skinny box that said it was a caramel taste-test. Twelve caramels, from vanilla to chili to fig & honey, lined up and labeled from one to twelve. It was too intriguing to resist. I brought it home and we gave it a try.

The box consisted of a cardboard sleeve that showed the caramels (each of which had a distinctive top decoration) in order. A cardboard tray slid out of the sleeve and the caramels sat in individual compartments of a plastic insert. The outer sleeve listed the twelve flavors: vanilla, maple, double espresso, toffee apple, strawberry black pepper, butterscotch, fig & honey, chili, himalayan salted, blood orange & balsamic, coconut, and stem ginger. The answers as to which caramel was which were on the underside of the cardboard tray—no peeking!
As the instructions suggested, we cut each caramel into quarters (this part was a bit messy). Since there were three of us, this left an extra piece to be eaten later after we’d checked the answers. One by one we sampled each caramel and wrote down our guesses. In some cases, the top decoration gave a bit of a hint as to what it was.
I was amazed at how difficult it was to guess some of the most familiar flavors. I got completely befuddled by vanilla, maple, and butterscotch caramels. A few of the flavors were quite clear and all three of us immediately said, “Oh, yes, I know this one!”, but there were others where one or two people felt certain of the answer and the other two or one remained utterly confused.
In the end, I got the lowest score: 6 out of 12 right. Only 50%. I’ve always thought I was pretty good at distinguishing smells, and should therefore be good at distinguishing tastes, but apparently I’m not nearly as good at this as I thought.
Maybe I need to eat more flavored caramels this year, just for practice?
Till next post.